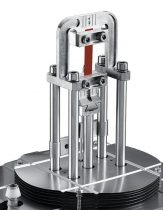
Dynamic Mechanical Analyzer
The world’s most powerful platform for mechanical measurements.
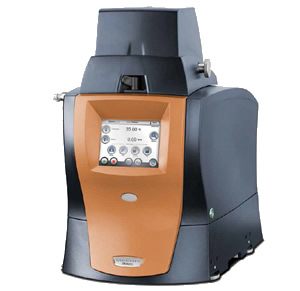
TA Instruments invites you to experience the ultimate in Dynamic Mechanical Analyzers, the Discovery DMA 850. Building on superior technologies of the world’s best-selling DMA, improvements in every aspect of DMA performance deliver the most accurate and reproducible measurement of mechanical properties over a wide temperature range. It’s never been easier to get great DMA data!
![]()
Features and Benefits:
- Non-contact, low mass motor delivers continuous forces from 0.1 mN to 18 N to measure everything from soft to stiff materials
- Frictionless, low-compliance air bearing design ensures superior force sensitivity and accuracy
- Unique optical encoder technology provides 0.1 nm resolution over a 25 mm continuous range of travel for ultimate testing versatility
- New DirectStrain™ and Intelligent Autoranging controls allow you to measure the widest range of sample stiffness and frequencies for the best data, the first time, every time
- Choice of two dedicated environmental systems for precise, responsive control under the most relevant test conditions
- Exclusive Air Chiller Systems provide effective controlled cooling to -100°C without the cost or hassle of liquid nitrogen
- Purpose-built, high-stiffness, low mass clamps are easy-to-use and ensure data repeatability
- New innovative “app-style” touch screen puts instrument functionality simply One-Touch-Away™, enhancing usability and making it easier than ever to get great data
- Powerful TRIOS software provides simple set-up and execution through separate test interfaces designed for novice or expert users.
- Commitment to quality backed by the industry’s ONLY five-year furnace warranty for peace of mind
| Deformation Modes | |
| Maximum Force | 18 N |
| Minimum Force | 0.0001 N |
| Force Resolution | 0.00001 N |
| Frequency Range | 0.001 to 200 Hz |
| Dynamic Deformation Range | ±0.005 to 10,000 μm |
| Strain Resolution | 0.1nm |
| Modulus Range | 103 to 3×10¹² Pa |
| Modulus Precision | ± 1% |
| Tan δ Sensitivity | 0.0001 |
| Tan δ Resolution | 0.00001 |
| Temperature Range | Standard Furnace: -160°C to 600°C RH Accessory: 5°C to 120°C |
| Time-Temperature Superposition | YES |
| Environment Systems | Temperature Range | Heating/Cooling Rates | Purge Gas |
| Standard Furnace | -160°C to 600°C | 20°C/min Heating 10 °C/min Cooling |
Air, nitrogen, argon, helium |
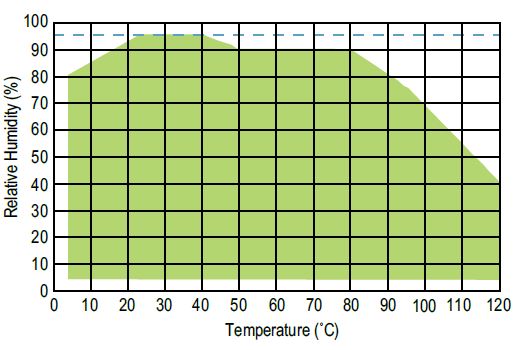
| DMA-RH Accessory | 5°C to 120°C | ±1 °C/min | Controlled humidity 5% to 95% RH |
The non-contact motor, frictionless air bearing support, and wide range optical encoder provide unparalleled flexibility for small and large samples, materials that creep, expand, or contract during an experiment, and application of static or transient deformations.
Air bearing
Stiff, Frictionless Air Bearing Support
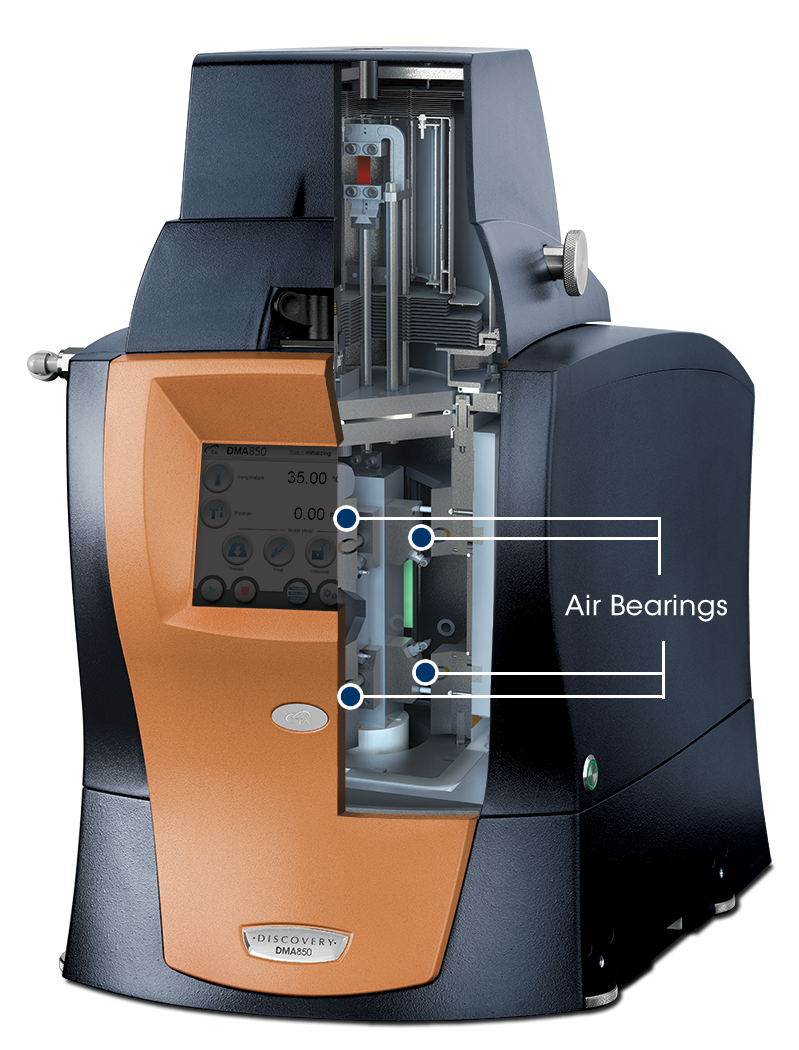
The non-contact drive motor transmits force directly to a rectangular air bearing slide. The slide is guided by eight porous carbon air bearings. Pressurized gas forms a frictionless surface that permits the slide to “float.” The slide connects directly to the drive shaft and sample clamp for an unsurpassed 25 mm of frictionless displacement. The rectangular shape of the drive shaft completely eliminates off-axis motion.
Only TA Instruments employs sophisticated air bearing technology for DMA measurements. Systems without this design feature suffer from poorly controlled deformation in unsupported designs, or diminished sensitivity where spring guidance is employed.
Optical Encoder
Wide Range, High Resolution Optical Encoder
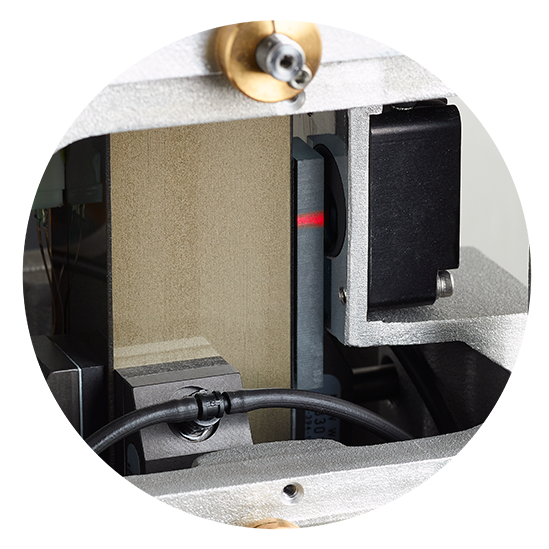
Based on diffraction patterns of light through gratings, optical encoders provide exceptional resolution over very wide ranges compared to LVDT’s used in competitive devices. Due to the excellent 0.1 nanometer resolution of the optical encoder, very small amplitudes can be measured precisely. Enhanced optical encoder sensitivity, combined with refined motor controls, results in displacements up to 100× smaller than previous drive technology, including control of displacements as small as 5 nm.
One Touch Away
“APP” Style Touch Screen
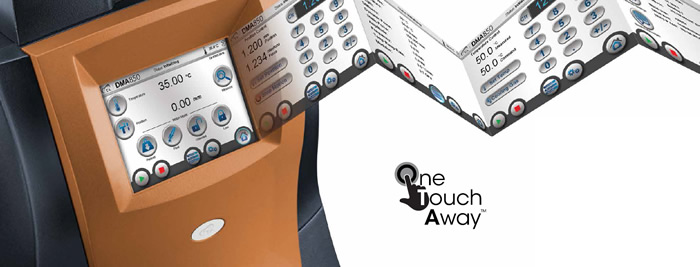
The DMA 850 boasts a brand-new One-Touch-Away™ app-style touchscreen that greatly enhances usability by placing key instrument features at your fingertips.
- Ergonomic design for easy viewing and operation
- Packed with functionality to simplify operation and enhance user experience
The app-style touch screen includes:
- Start/stop experiments
- Set temperature
- Set clamp position
- Toggle motor modes
- Measure sample
- Real-time signals
- Test and instrument status at a glance
The app-style touchscreen, powerful new TRIOS software, and quick robust calibration routines work seamlessly to dramatically improve laboratory workflows and productivity.
Motor
Responsive Direct Drive Motor
The DMA 850’s non-contact motor applies both dynamic and static deformation over the full 25 mm range of motion, providing exceptional control in all modes and clamp positions.
The motor is constructed of high-performance lightweight composites that maximize axial and torsional stiffness while minimizing system inertia. Sophisticated control electronics enable the fastest motor control over the widest continuous range of force, from 0.1 mN to 18 N. This enables the system to capture a broad spectrum of material properties with the highest level of sensitivity and accuracy. These precision controls also provide vast improvements in transient response, including a step-displacement response of 50 ms, as well as a 100× improvement in stress-control accuracy.
Unlike competitive motor designs that provide either high force or high resolution, or require separate inferior motors for linear travel, the DMA 850 achieves a continuous range of linear travel and high-resolution force measurement.
Optimized Mechanics
Optimized Mechanics
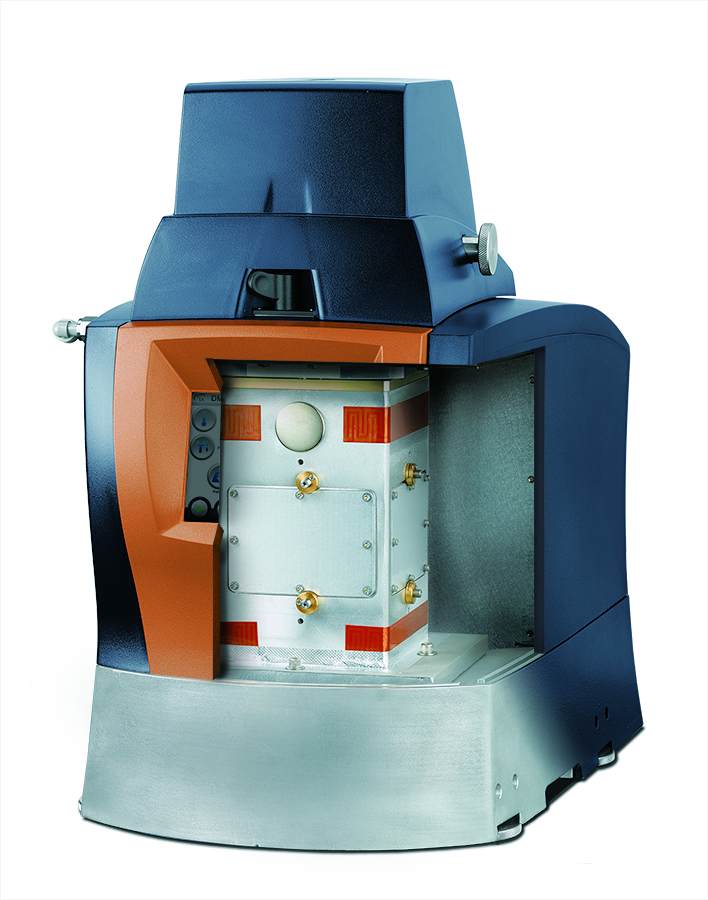
The critical drive components of the DMA 850 are mounted within a high-stiffness aluminum casting that is rigidly mounted to an FEA-optimized instrument frame. Competitive systems based on moveable, hanging, or soft-mounted frames are constrained in their effective frequency-range by the combination of sample stiffness and system resonance. The rigid design of the DMA 850 overcomes this limitation, providing accurate modulus and tan δ values across the broadest range of measurement frequencies and sample stiffness.
Temparature Controlled Transducer
Temperature-Controlled Transducer
The transducer is temperature-controlled to eliminate drift associated with temperature changes from the sample or laboratory environment. The result is the most stable platform for mechanical characterization of materials even under extreme conditions. The DMA 850 is the only commercial DMA instrument to feature a temperature-controlled force and displacement transducer, providing unparalleled measurement stability and accuracy.
![]()
Auto Ranging
Auto-Ranging
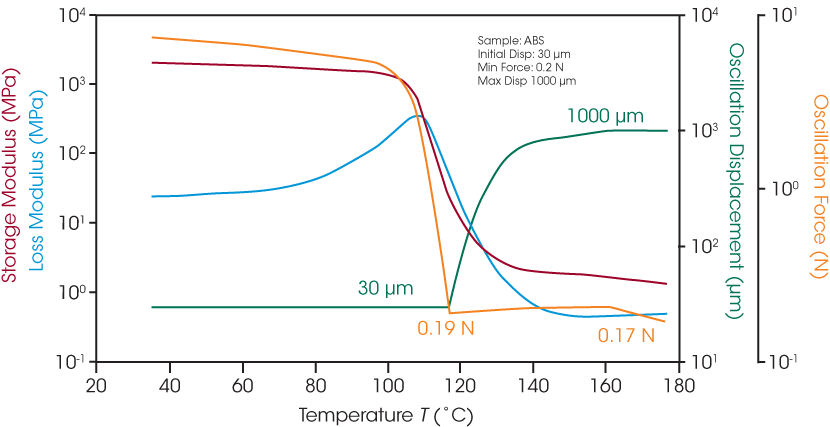
Because the modulus of a material can change by several orders of magnitude in a narrow range of time or temperature, the selection of programming parameters can make or break an experiment. If the deformation chosen is too large there could be excessive sample creep. If it is too small, force sensitivity suffers. The all new intelligent Auto-Ranging feature takes the guess work out of selection of starting conditions and ensures force and displacement are automatically maintained within reasonable user defined limits. Program the experiment and walk-away with the peace of mind that you will get great data the first time, every time.
Direct Strain
DirectStrain
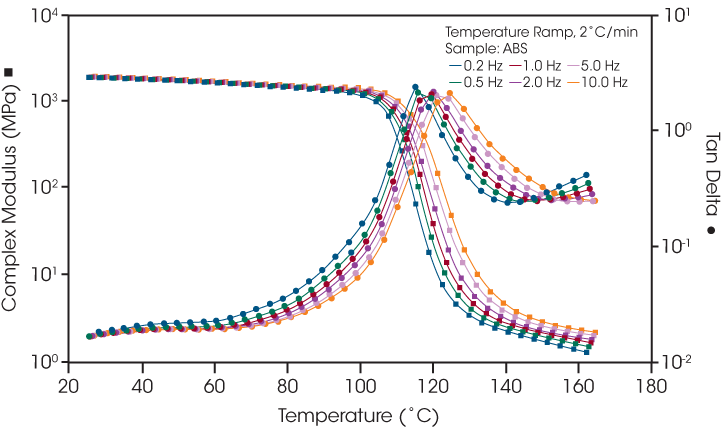
Faster electronics, all new digital signal processor (DSP) controls, and an enhanced drive system allow for an all-new type of strain control in the DMA 850. DirectStrain is real-time strain control for faster and more accurate measurements of challenging samples and test conditions, such as rapidly changing materials or soft specimens at high frequencies. DirectStrain guarantees consistent data collection even during transitions on quickly changing samples and a 50× improvement in strain accuracy over conventional DMA technology.
In this example, the use of DirectStrain allowed for modulus at tan δ at six frequencies to be measured in a single experiment at a ramp rate (2°C/min) that is typical of single-frequency temperature ramps.
Benefits of Direct -Strain include:
- Real-time strain control for fast and accurate measurements
- 50× improvement in strain accuracy
- 35% improvement in measurement speeds
- No overshoots or undershoots that are typical of iterative control methods
- Improved accuracy for soft specimens at high frequencies
- Uniform data collection even at fast ramp rates
TRIOS Software
 TRIOS Software
TA Instruments’ state-of-the-art software package uses cutting-edge technology for instrument control, data collection, and data analysis for thermal analysis and rheology. The intuitive user interface allows you to simply and effectively program experiments, and move easily between processing experiments and viewing and analyzing data.
- Control multiple instruments with a single PC and software package
- Overlay and compare results across techniques including DSC, TGA, DMA, SDT and rheometers
- Unlimited licenses and free lifetime software upgrades
- One-click repeated analysis for increased productivity
- Automated custom report generation including: experimental details, data plots and tables, analysis results
- Convenient data export to plain-text, CSV, XML, Excel®, Word®, PowerPoint®, and image formats
- Optional TRIOS Guardian with electronic signatures for audit trail and data integrity.
DMA Express
![]()
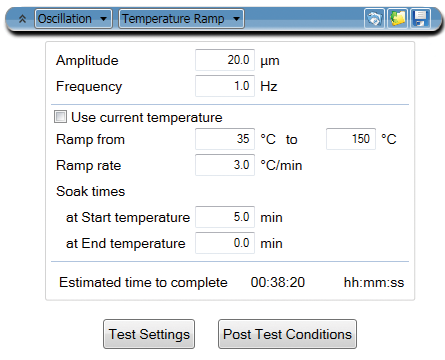
The new DMA Express interface is designed specifically for new users and those with simple, well-defined experimental requirements it presents test setup details in easy-to-choose, self-contained forms. The user is presented with all necessary testing parameters in a self-contained window, populated with sensible default starting parameters. For routine use and common test types, DMA Express shortens training time, reduces the possibility for mistakes in experimental design, and inspires confidence.
| Test Modes | Available Testing |
| Oscillation | Frequency Sweep, Strain Sweep, Stress Sweep, Temperature Sweep, Temperature Ramp, Time Sweep, Temperature Sweep (Multi-frequency)/ TTS, Temperature Ramp (Multi-frequency), Fatigue Test |
| Stress Control | Creep, Creep-Recovery, Creep TTS, IsoStress |
| Strain Control | Stress Relaxation, Stress Relaxation TTS, IsoStrain |
| Rate Control | Strain Ramp, Stress Ramp |
DMA Unlimited
![]()
The DMA Unlimited interface delivers the DMA 850’s powerful new capability to sequence any and all deformation modes and thermal profiles in a single test. Go beyond conventional DMA testing and program experiments that mimic complex real-world conditions through an unlimited combination of 23 available steps. Choose from the core DMA Express test modes plus advanced sample conditioning, deformation, conditional step termination, and repeat segment capabilities. The only limit is your imagination!
Additional Experiment Controls:
- Equilibrate or Jump to a set temperature, set Soak time at target temperature
- Set or Increment Relative Humidity levels, set Soak time at target RH
- Set or Increment a Force/Stress
- Set or Increment a Displacement/Strain
- Loop and repeat previous steps
- Data storage On/Off, set data sampling intervals
- Control Motor State, set external events, refill GCA
Unlimited Test Sequencing
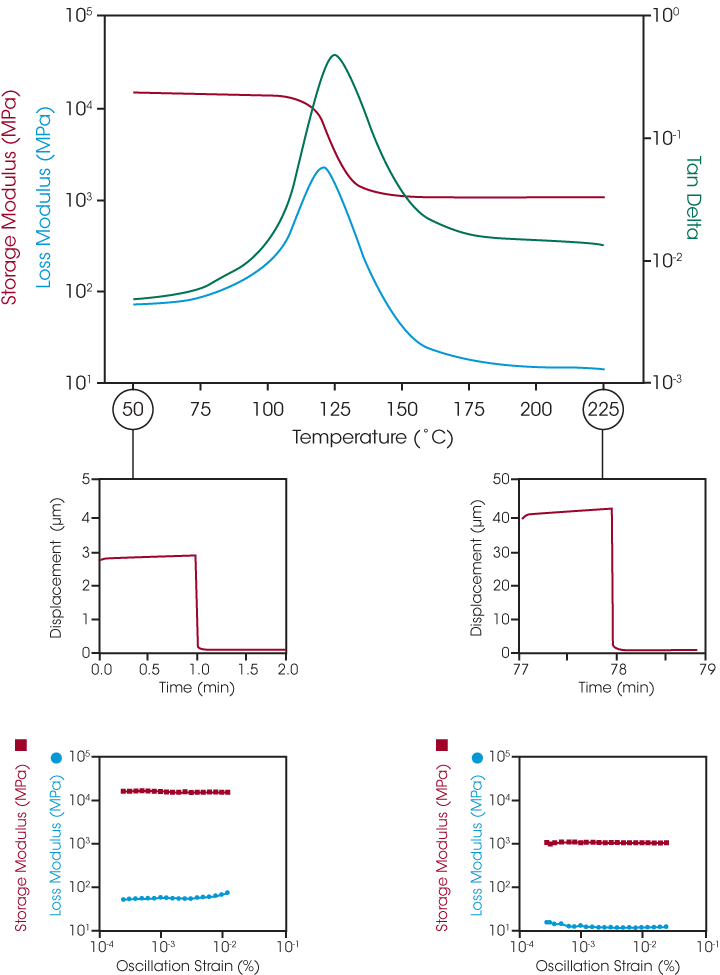
The DMA 850’s advanced system architecture opens up unprecedented mechanical testing possibilities that are not bounded by limitations inherent to conventional DMA instruments. For the first time, design test procedures that contain any combination of available test types including oscillation, transient, strain- and stress- control, mechanical and thermal conditioning, and more. With this new capability, the DMA 850 can perform a complete material characterization protocol under a diverse test conditions in a single experiment, or apply mechanical conditioning immediately followed by characterization. This new capability unlocks complete material characterization under virtually any set of test conditions.
Data Analysis Capabilities
Data Analysis
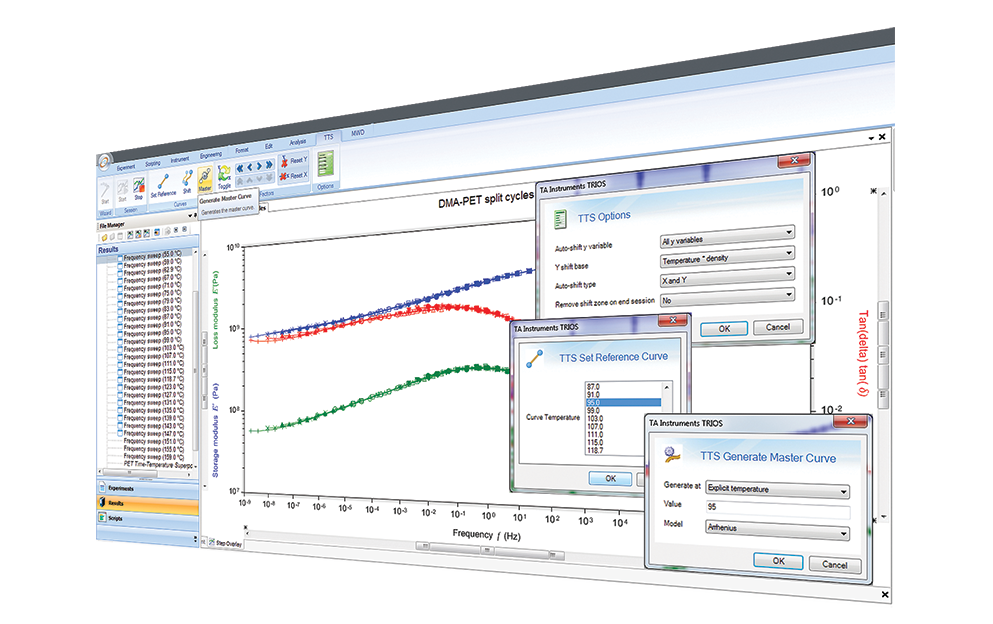 A comprehensive set of relevant tools are available for real-time data analysis, even during experiments. Gain actionable insights into your material behavior through a powerful and versatile set of features seamlessly integrated into TRIOS.
All Standard DMA Analyses:
- Onset and endset analysis
- Signal maximum and minimum
- Signal change
- Modulus crossover
- Curve values at specific X or Y points
- 1st and 2nd derivatives
- Area under the curve
- Peak height
- Peak integration, and running integral
- Mathematical fitting: straight line, polynomial, or exponential
Advanced Analysis Capabilities:
- Time-Temperature Superposition (TTS) analysis with automatic curve shifting and simple Mastercurve generation
- Activation Energy calculation
- WLF coefficient calculation
- Cole-Cole and Van Gurp-Palmen plots
- Built-in models for: relaxation spectra, interconversion of moduli, and creep ringing analysis
- Advanced custom analysis with user-defined variables and models
Quick & Easy Calibration
Quick & Easy Calibration
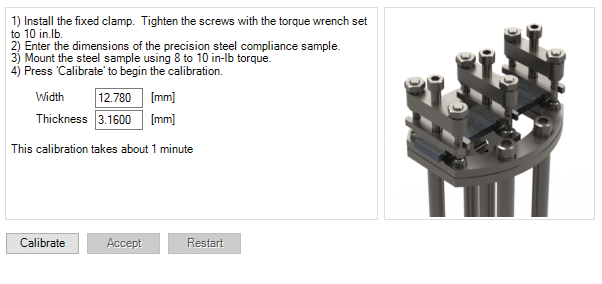
TRIOS software makes calibrating the clamps and the DMA 850 effortless, even for users with no previous DMA experience! Photorealistic images and clear instructions reduce operator training time by guiding them through simple procedures. A summary report provides calibration status at a glance and ensures data integrity.
Complete Data Record
Complete Data Record
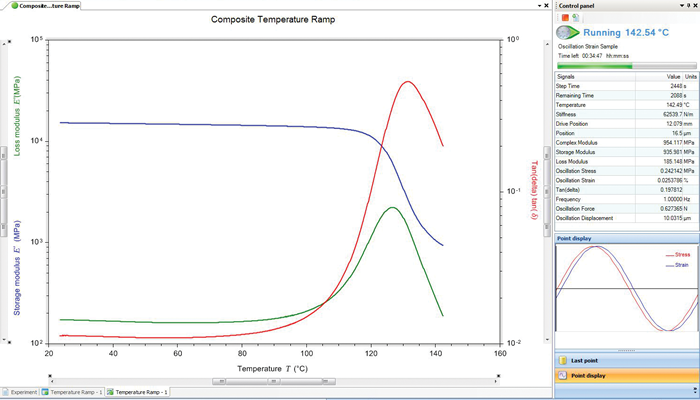
The advanced data collection system automatically saves all relevant signals, active calibrations, and system settings. Waveforms for each data point may be displayed as Lissajous plots and provide a visual representation of the stress-strain relationship. This comprehensive set of information is invaluable for method development, procedure deployment and data validation.
The DMA 850 features clamps in a complete set of deformation types, so a broad range of samples can be accurately analyzed and closely resemble real world process or application conditions. Each clamp is individually optimized for accuracy and ease-of-use.
Clamp Features & Benefits
Features & Benefits
- High stiffness, low mass designs provide maximum modulus accuracy
- Low thermal mass reduces temperature equilibration time and optimizes transition temperature accuracy and precision
- Individual clamp stiffness calibrations ensure modulus accuracy and repeatability, especially between operators
- Simple dovetail connection is easy to install and self-aligns, increasing precision and reducing installation time
- Limited number of individual components reduces complexity, misalignment, and measurement error
- Innovative designs for difficult measurements like powder and materials immersed in a fluid
- NEW, improved designs for tension, compression, and shear clamps significantly improve ease-of-use by further simplifying alignment and making sample loading more reproducible
Only TA offers clamps that are ready to use out of the box without complex assembly procedures inherent to competitive designs.
Dual/Single Cantilever
Dual/Single Cantilever
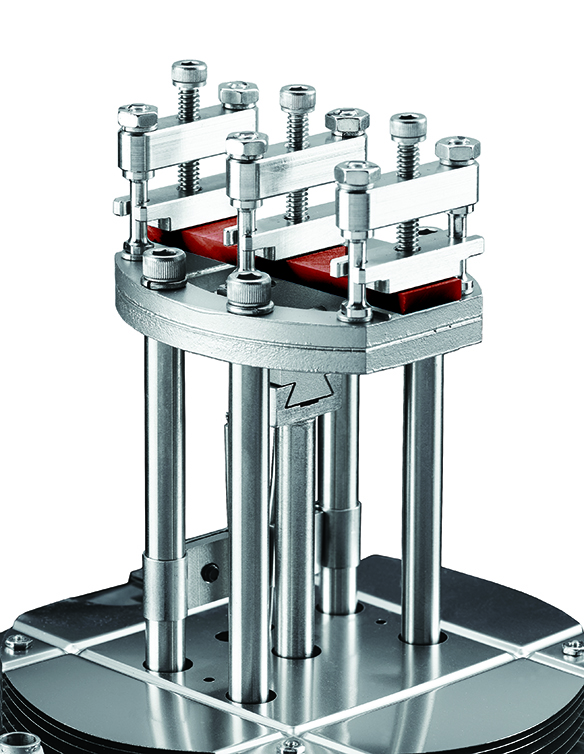 Cantilever (clamped) bending is a good general-purpose mode for evaluating thermoplastics and highly damped materials (e.g., elastomers). Available in sample lengths of 8 mm, 20 mm, and 35 mm, the cantilever clamps can be used in single or dual configurations. Dual cantilever is especially ideal for measuring the cure of supported thermosets.
Tension
Tension
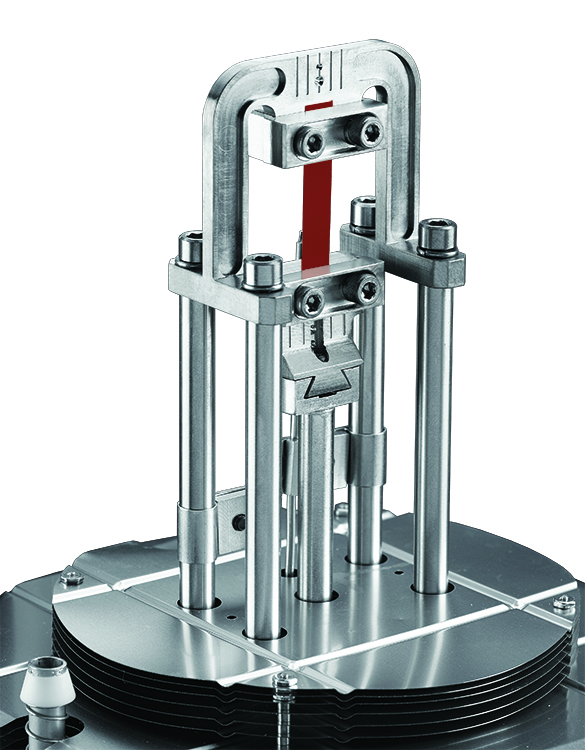 Tensile clamps are designed for uniaxial deformation of films and fibers. In oscillation experiments, the instrument uses constant and variable methods to apply a static load that prevents buckling and unnecessary creep. A newly designed film tension clamp simplifies the clamping mechanism to improve ease-of-use, clamping uniformity, and effectively prevents sample slippage. Visual guides aid in aligning film samples and integrated supports simplify fiber testing. The continuous travel of the DMA 850 makes sample loading in tension especially convenient.
3-Point Bend
3-Point Bend
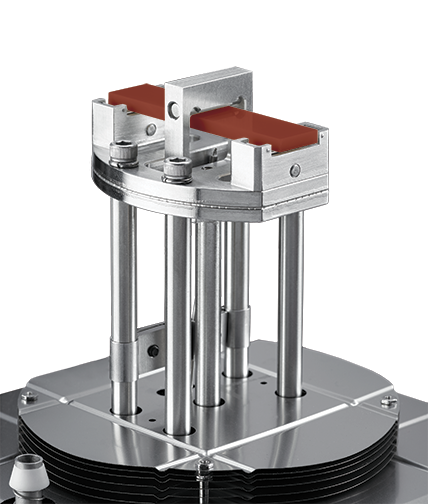
3-point bending, or free bending, is often considered a “pure” mode of deformation because clamping effects are eliminated. Sample spans of 5 mm, 10 mm, 15 mm, 20 mm, and 50 mm are available to accommodate a wide range of sample stiffness and specimen sizes. A unique low-friction, roller bearing supported design available on the 20 mm and 50 mm clamps improves modulus accuracy and reproducibility by accommodating and accounting for twist or curvature in the test specimen.
Shear Sandwich
Shear Sandwich
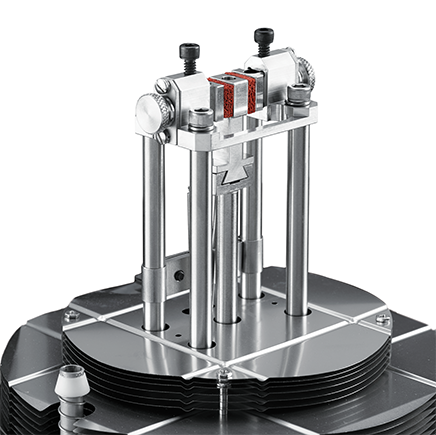
Two equal-size pieces of the same material are sheared between a fixed and moving plate for the measurement of shear modulus, G. This mode is ideal for soft materials such as gels, pressure sensitive adhesives, and high viscosity resins.
Compression
Compression
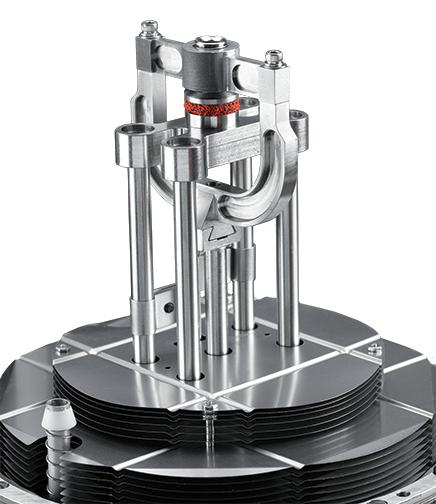 Parallel plate compression measurements are most suitable for low to moderate modulus materials such as foams and elastomers. It can also be used to measure expansion or contraction, tack testing for adhesives, compression set of rubber o-rings, and much more. A new self-aligning mechanism ensures the parallelism of upper and lower plates, enhancing strain and force uniformity while simplifying user interaction and improving modulus accuracy and precision.
The standard compression kit includes parallel plates of 15 mm and 40 mm diameter, ideally designed for bulk measurements of moderate to low stiffness samples. The penetration kit is designed for higher stiffness materials and local measurements through the use of smaller probes: hemispherical, 1 mm penetration, or 6 mm plate.
Powder Clamp
Powder Clamp
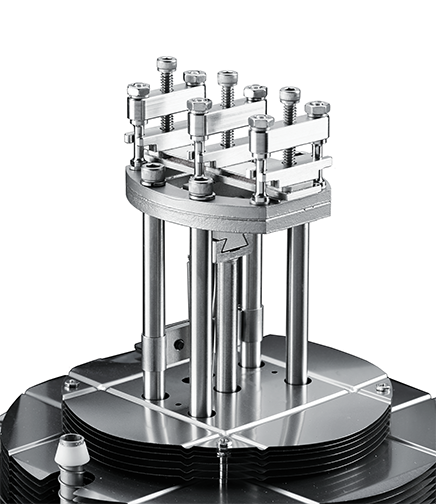 The transition temperatures of loose powders can be difficult to measure by mechanical techniques. The powder accessory for the DMA850 is used with the dual cantilever clamp to observe transition temperatures of loose powdered materials by DMA, combining the enhanced sensitivity of mechanical analysis with the simple sample preparation of powder characterization techniques.
Submersion
Submersion
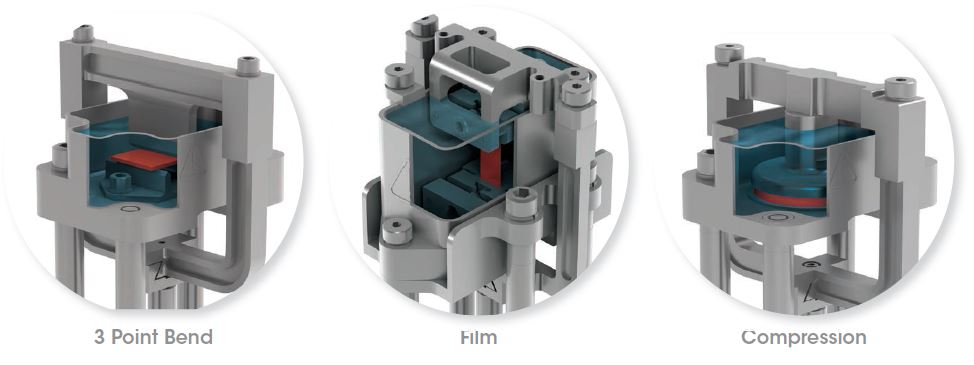 Submersion clamps for the DMA 850 are designed specifically to provide the ideal test conditions for measuring mechanical properties in a fluid environment up to 150°C.
- Accurate sample temperature is obtained by a thermocouple placed within the fluid reservoir and close to the sample
- Inert stainless steel construction and a seal-free design ensure compatibility with a wide range of fluids
- Temperature control provided by the Standard Furnace without additional circulators or environmental systems
Sample Sizes
Sample Sizes
| Deformation Modes | |
| Dual/Single Cantilever | 8/4* mm (L), Up to 15 mm (W) and 5 mm (T) |
| 20/10* mm (L), Up to 15 mm (W) and 5 mm (T) | |
| 35/17.5* mm (L), Up to 15 mm (W) and 5 mm (T) | |
| 3-Point Bend | 5,10, or 15 mm (L), Up to 15 mm (W) and 7 mm (T) |
| 20 mm (L), Up to 15 mm (W) and 7 mm (T) | |
| 50 mm (L), Up to 15 mm (W) and 7 mm (T) | |
| Tension | |
| Film/Fiber | 5 to 30 mm (L), Up to 8 mm (W) and 2 mm (T) |
| Fiber | 5 to 30 mm (L), 5 denier (0.57 tex) to 0.8 mm diameter |
| Shear | 10 mm square, Up to 4 mm (T) |
| Compression | 15 and 40 mm diameter, Up to 10 mm (T) |
| Submersion | |
| Tension | Fixed at 15 mm (L), Up to 8 mm (W) and 2 mm (T) |
| Compression | 25 mm diameter, Up to 10 mm (T) |
| 3-Point Bend | 5, 10, or 15 mm (L), Up to 15 mm (W) and 7 mm (T) |
The DMA 850 offers your choice of two dedicated environmental systems: the Standard Furnace and the DMA-RH Accessory for humidity and temperature control. Installation is simple, making it convenient to switch between systems as required. All environmental systems and accessories are designed specifically for high performance DMA measurements and seamless integration and are manufactured by TA Instruments.
Standard Furnace
Standard Furnace
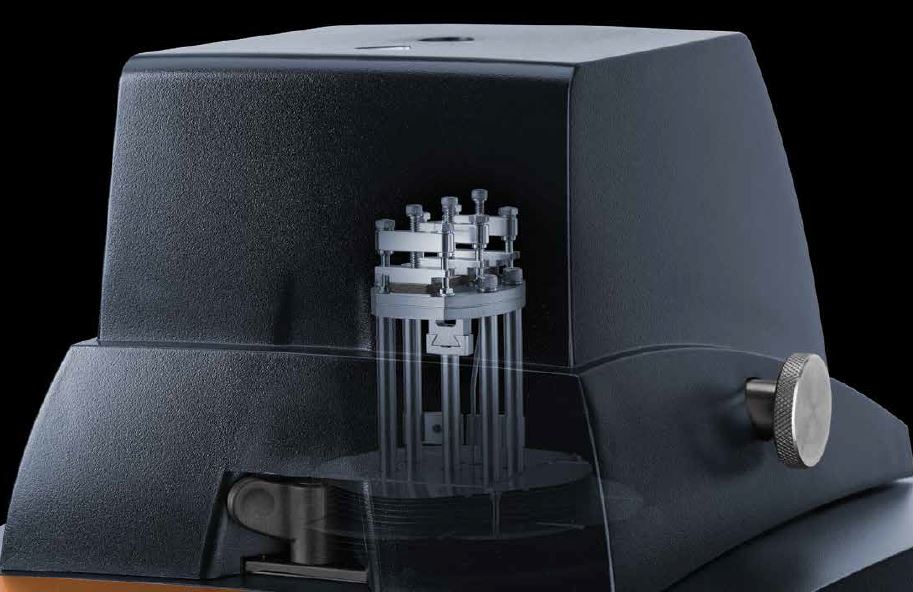
The Standard Furnace for the DMA850 is a wide-range bifilar wound furnace that provides uniform temperature control from -160°C to 600 °C. This field-proven design provides for efficient and precise temperature control over the entire temperature range in heating, cooling, and isothermal operation. For subambient temperature control, the furnace is used in combination with one of four available cooling accessories to meet your testing requirements. A high-sensitivity thermocouple is in close proximity to the sample to provide a representative measurement of sample temperature, regardless of the mode of deformation being employed.
| Temperature range | -160 to 600 ˚C |
| Heating Rate | 0.1 to 20 ˚C/min |
| Cooling Rate | 0.1 to 10 ˚C/min |
| Isothermal Stability | ± -.1 ˚C |
Gas Cooling Accessory
Gas Cooling Accessory
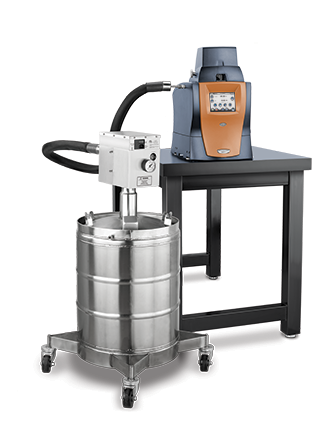 The Gas Cooling Accessory (GCA) extends the operating range of the DMA 850 to -150°C. The GCA uses cold nitrogen gas generated from controlled evaporation of liquid nitrogen. Automated filling of the GCA tank can be programmed to occur after the scan is complete.
The GCA will provide ballistic or controlled cooling rates over the entire operating range of the DMA 850 (-150 to 600°C). In general, the maximum cooling rate is a function of the installed clamp and the thermal characteristics of the sample. The figure below shows the typical range* of controlled cooling rates available as a function of temperature.
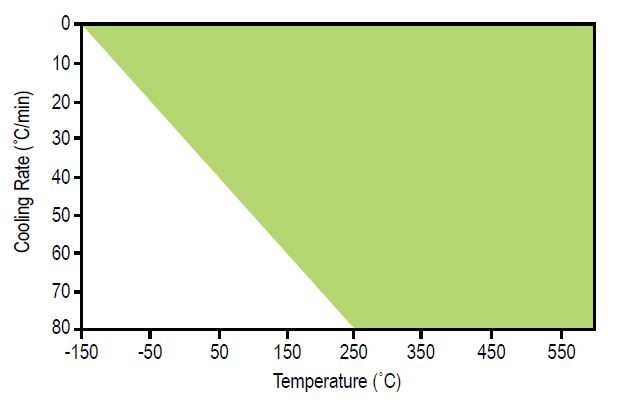
*Actual performance may vary slightly depending on laboratory conditions and the clamping system installed.
Air Chiller Systems (ACS)
Air Chiller Systems (ACS)
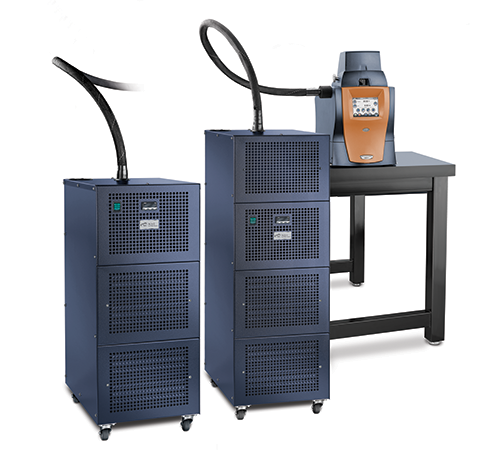
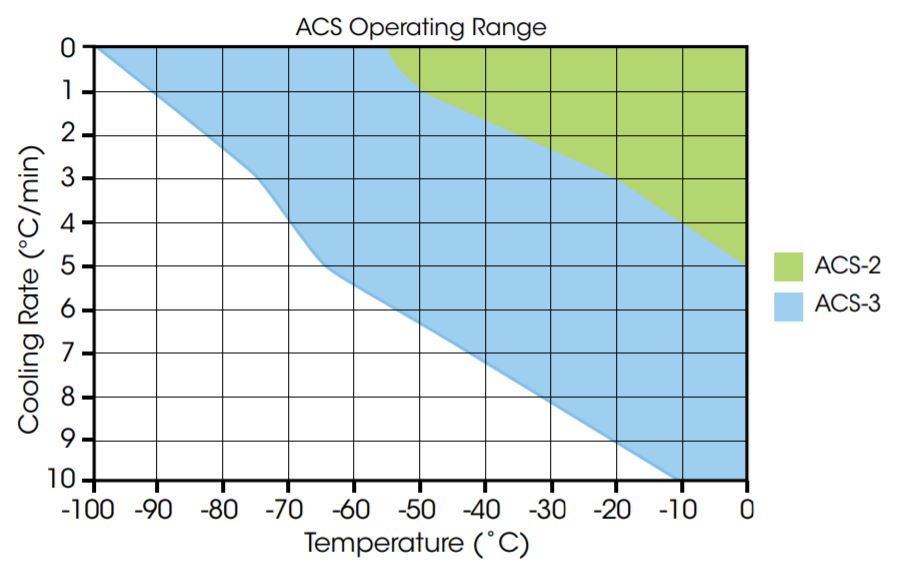
The new Air Chiller System models offer unique gas flow cooling systems that provide the capability for sub-ambient testing without the use of liquid nitrogen. Available in two models, the ACS-2 and ACS-3, the chillers feature a multi-stage cascading compressor design that employs compressed air (7 bar, 200 l/min) as the cooling medium. The ACS-2 and ACS-3 models permit operation of the DMA 850 with Standard Furnace at temperatures as low as -50 °C and -100 °C respectively *. The chiller systems can help eliminate or reduce liquid nitrogen usage and associated hazards from any laboratory and offer an incredible return on investment.
Nitrogen Purge Cooler
Nitrogen Purge Cooler
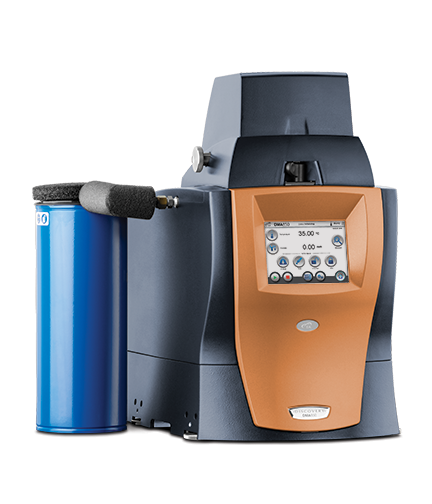 The Nitrogen Purge Cooler (NPC) is an innovative alternative for low temperature testing with the DMA 850. The NPC provides crash-cooling and controlled heating at temperatures as low as -160°C with all testing geometries. It is also an ideal choice for minimizing the cool-down time between consecutive experiments. A 2.5 L liquid-nitrogen filled dewar with heat exchanger cools nitrogen gas (2 bar to 8 bar, 30 L/min) before being fed to the DMA 850 Standard Furnace. The NPC is a small, economical, and effective option for laboratories that have basic cooling requirements.
DMA-RH Accessory
DMA-RH Accessory
This precision environmental system provides accurate control of sample temperature and relative humidity for DMA experiments. A custom-designed humidity and temperature chamber optimized for mechanical measurements provides stable, reliable control of temperature and humidity over a wide range of operating conditions. The system successfully prevents condensation, a common occurrence in controlled-humidity environments which makes accurate control of relative humidity impossible. Stable, responsive peltier elements precisely control sample temperature while calibrated digital mass flow controllers deliver pre-heated gas of the prescribed ratio to achieve the target humidity.
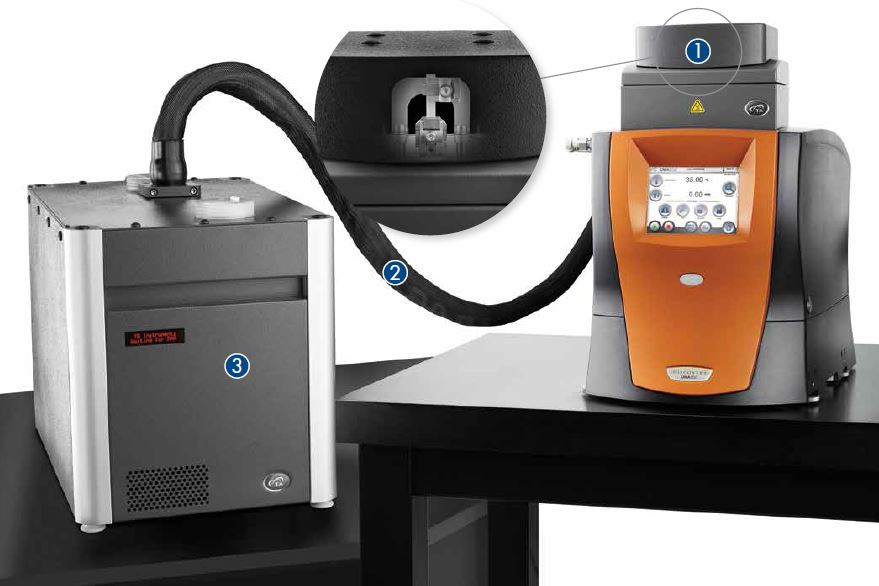
The DMA-RH Accessory is a fully integrated unit and includes the following hardware components:
- The sample chamber mounts directly to the DMA. Peltier elements in the chamber precisely control the temperature to ±0.1°C. The sample chamber accommodates standard DMA clamps (tension, cantilever, and 3-point bending).
- A heated vapor-transfer line is maintained at a temperature above the dew point temperature of the humidified gas in order to avoid condensation and provide accurate results.
- The DMA-RH Accessory contains the humidifier and electronics which continuously monitor and control temperature and humidity of the sample chamber.
| Temperature range | 5 to 120 ˚C |
| Temperature Accuracy | ± 0.5 ˚C |
| Heating/Cooling Rate | Maximum ±1˚C/min |
| Humidity Range | See humidity range chart below |
| Humidity Accuracy | 5-90% RH: ±3% RH |
| >90% RH: ±5% RH | |
| Humidity Ramp Rate (both increasing and decreasing) |
2% RH/min (fixed) |
Humidity Range
